Transforming Digital Graphics with a Cross Stitch Photoshop Action
Digital design often suffers from an excess of perfection. Lines are too straight, colors are too uniform, and textures lack the tactile warmth that draws the human eye. For creators, marketers, and small business owners, breaking through this digital sterility is essential for capturing attention. This is where a Cross Stitch Photoshop Action becomes a vital tool in your creative arsenal. It is not merely a filter; it is a workflow accelerator that bridges the gap between modern graphic design and traditional craft aesthetics.
Integrating this type of asset into your process allows you to convert any standard graphic into a textured, handcrafted visual style instantly. Whether you are designing social media content, creating unique merchandise mockups, or developing branding materials that require a cozy, artisanal feel, understanding how to implement this tool effectively can significantly enhance your output quality and efficiency.
The Role of Texture in Modern Design Workflows
Before diving into the technical execution, it is important to understand where this tool fits within a broader design strategy. In contemporary marketing and content creation, authenticity is a high-value currency. Consumers are increasingly drawn to visuals that feel "made" rather than "generated." A cross-stitch effect provides immediate visual weight and nostalgia, triggering emotional responses associated with comfort, care, and tradition.
However, manually creating cross-stitch patterns in Photoshop is a tedious, time-consuming process involving complex grid setups, manual pixel placement, and extensive layer management. This is impractical for professionals working under tight deadlines. A dedicated Cross Stitch Photoshop Action automates this labor-intensive process, allowing you to maintain a high volume of output without sacrificing the unique aesthetic appeal. It transforms a task that could take hours into one that takes seconds, freeing up mental energy for higher-level creative decisions such as composition, color theory, and messaging.
Essential Components and Asset Organization
To use this tool effectively, you must first understand its components. A robust package typically includes several distinct file types, each serving a specific function in your workflow. Proper organization of these assets is the first step toward efficient implementation.
- Actions (.atn): The core engine. These are automated scripts that apply the cross-stitch effect. Look for actions that offer variability, such as different stitch densities or thread styles.
- Brushes (.abr): Essential for manual touch-ups. Embroidery brushes allow you to paint individual stitches or correct errors where the automated action may have missed details.
- Patterns (.pat): These define the underlying texture of the fabric or the specific look of the thread, ensuring the result looks realistic rather than flat.
- Styles (.asl): Layer styles that add depth, shadow, and highlight to the stitches, giving them a three-dimensional appearance.
- Fonts and Guides: Access to free stitch-style fonts and user guides ensures consistency across text-based designs.
Store these files in a dedicated directory within your Adobe Creative Cloud libraries or a local project folder. Consistency in file management prevents lost assets and reduces friction when starting new projects. For teams, centralizing these resources on a shared drive ensures that every designer produces work with the same visual standards.
Step-by-Step Implementation Strategy
Implementing a Cross Stitch Photoshop Action requires more than just clicking a button. To achieve professional results, you must prepare your source image correctly. The quality of the output is directly dependent on the quality of the input and the settings chosen during execution.
1. Preparation and Image Selection
Not all images translate well to cross-stitch. High-contrast images with clear shapes work best. Complex photographs with subtle gradients may lose detail when converted to a grid-based format. Before running the action, simplify your design. Increase contrast slightly and ensure the subject is clearly defined against the background. If you are working with text, choose bold, sans-serif fonts initially, as thin lines may disappear in the stitching process.
2. Running the Action
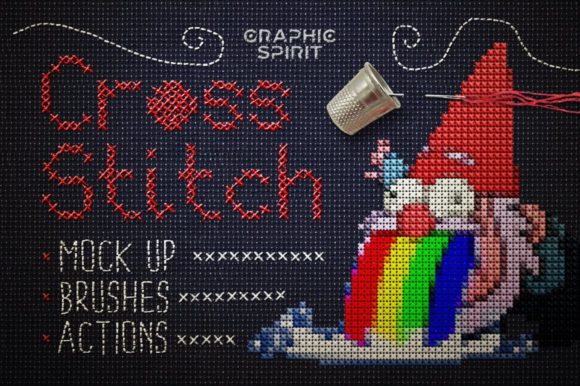
Open your prepared image in Photoshop. Navigate to the Actions panel and load the Cross Stitch Actions.atn file. Select the appropriate action—many packages include options for "Dark Canvas," "Light Canvas," or specific wool textures. Play the action. The script will automatically generate the necessary layers, apply the pattern, and adjust the colors to match the thread palette.
During this phase, observe how the action handles color reduction. Cross-stitch relies on a limited color palette. If the result looks muddy, you may need to adjust the source image's saturation or brightness before re-running the action. Iteration is key here; do not expect perfection on the first try.
3. Refinement with Brushes and Styles
Once the action completes, the result is rarely final. Use the included Stitch Brushes.abr to manually add or remove stitches in areas that require higher definition. This is particularly useful for edges and fine details. The Canvas Styles.asl can be applied to add realistic shadows, making the stitches appear raised off the fabric. This step adds the necessary depth that distinguishes a professional mockup from a flat digital effect.
Integrating with Broader Creative Projects
The true value of this tool emerges when it is integrated into larger projects. Consider its application in various professional scenarios:
Product Mockups: If you sell physical embroidery kits or custom apparel, use the Embroidery frame.psd and included mockups (thimble and needle) to present your designs in a realistic context. This helps customers visualize the final product, increasing conversion rates for e-commerce stores.
Social Media Content: For bloggers and marketers, cross-stitch graphics stand out in crowded feeds. Use the action to create quote graphics using the free stitch-style fonts. The tactile nature of the text encourages users to pause and read, improving engagement metrics.
Educational Materials: Educators can use these visuals to make worksheets or presentation slides more engaging. The friendly, approachable aesthetic of cross-stitch can lower anxiety around complex topics, making learning materials feel more accessible.
Quality Control and Consistency
Maintaining visual consistency is crucial for brand identity. When using a Cross Stitch Photoshop Action across multiple designs, establish a standard operating procedure. Decide on a default canvas size, a preferred color palette, and a specific set of layer styles. Document these choices in a simple style guide.
Pay attention to resolution. Cross-stitch effects can look pixelated if viewed at large sizes without proper preparation. Always work at high resolutions (300 DPI for print, 72 DPI for web but at large dimensions) to ensure the individual stitches remain crisp. Use the User Guide provided in the package to understand any specific resolution requirements for the actions to function correctly.
Additionally, test your designs on different backgrounds. The Dark Canvas and Light Canvas styles interact differently with surrounding elements. Ensure that there is sufficient contrast between your stitched design and the background it will be placed on in its final application.
Long-Term Value and Skill Development
Investing in a specialized tool like this is not just about saving time on a single project; it is about expanding your creative capabilities. By mastering the nuances of digital embroidery simulation, you add a unique skill to your portfolio. This differentiation can be a significant competitive advantage for freelancers and agencies looking to offer niche services.
Furthermore, the included resources, such as the list of 14 free stitch-style fonts and various stitch patterns, provide a foundation for further experimentation. Over time, you can combine these actions with other Photoshop techniques—such as blending modes, adjustment layers, and masking—to create hybrid styles that are entirely unique to your brand.
In conclusion, a Cross Stitch Photoshop Action is a powerful instrument for modern creators. It balances the efficiency required in professional workflows with the artistic depth needed to connect with audiences. By preparing your assets carefully, refining the automated output, and integrating the results thoughtfully into your broader design strategy, you can produce high-quality, tactile visuals that stand out in a digital world. Embrace the process, experiment with the tools, and let the texture of your work speak for itself.